Posts

Showing posts from 2013

DIY I-SPY Bottles

Image
DIY I-SPY Bottles     WHAT YOU WILL NEED:   CLEAN EMPTY PLASTIC BOTTLE FUNNEL DYED OR PLAIN WHITE RICE STRONG GLUE SMALL OBJECTS INDEX CARD RUBBER BAND     The first step will be dying your rice, if you chose to do so.  This is the most time consuming step.   I used a tutorial from http://www.mamamiss.com/2012/05/08/tutorial-kool-aid-dyed-rice/ . I did DOUBLE the recipe because I had to dye 20LBS of rice for this craft for a WHOLE group.   After the rice in completely dry use a funnel with a LARGE opening to pour your rice into the bottle.  You could also fashion a paper funnel if you do not have a plastic funnel handy. It WILL NOT matter what order you put the dyed rice in.  It will get all mixed together eventually.     Make sure you do NOT fill all the way to the top of the bottle.  The rice needs room in the bottle.  If using a Gatorade bottle as shown above, fill about to the expiration date.   Add your small objects into the bottl
Composition Notebook Journals

Image
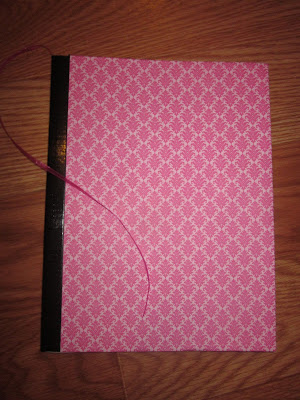
Journals   WHAT YOU WILL NEED:   COMPOSTION NOTEBOOK CRAFT PAPER (4 SHEETS OF YOUR CHOOSING) TACKY/ELMERS GLUE PAPER TOWEL OR FOAM PAINT BRUSH DUCTAPE RIBBON LARGE ENELOPE (OPTIONAL) STICKERS (OPTIONAL)   First step is to glue your front.  MAKE SURE that you use a paper towel or foam brush to smear the glue on evenly to avoid bubbling and wrinkling. Fold over the access paper to the inside.  Repeat on back cover.    For the inside, trim a piece of scrapbook paper to cover the inside writing.   Smear glue on to the Notebook and add the paper.  Repeat for the back inside.  Smearing glue onto the paper and then applying the paper tends to create wrinkles.       For an added feature you can choose to add a pocket or an envelope to your journal.  I decided that instead of digging around for a card envelope that I would just use a piece of left over scrapbook paper.        Glue the envelope or pocket into the front ins

Melted Crayon Flower Art

Image
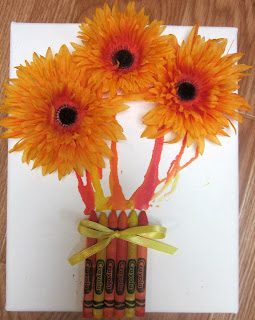
  My 1st Creation  WHAT YOU WILL NEED:   -CANVAS (I USED 8X10) -CRAYONS -RIBBON (OPTIONAL) -HOT GLUE GUN & STICKS -HEAT GUN OR HAIR DRYER -ARTIFICIAL FLOWERS Select 6 Crayons to use in your project.  You can make them match your flowers, like I did.  Or you can choose whatever your heart desires. Find you need to find the center of your canvas.  Put a small mark with one of the crayons in the middle of the canvas.  This will help you keep the crayon flower pot centered on the canvas. Use the hot glue gun to glue the flowers to the canvas, name brand side up.  Start with the middle two crayons and work your way out on both sides.  Let the hot glue cool down for a few minutes. Next turn on your heat gun or hair dryer and begin to melt the crayons.  From personal experience using Crayola crayons you should aim the gun/dryer at a downward angle after the 'C' in Crayola.  Any higher will cause the wax to pour out of the bottom of the cra

Will Elmer's Glue Remove Blackheads?

Image
Ever since a friend of mine posted on her Facebook page that she had used Elmer's Glue to remove her blackheads, I wanted to try it out myself.   Her results were amazing!  She said everyone was noticing how smooth her skin looked after she pulled off the dried glue! I was cursed with pores the size of pin heads.  Yay me.  Not.  I have struggled with blackheads since Elementary school.  Seriously.  I have tired countless washes, strips, and home remedies.  So I thought, Hey maybe THIS will be the answer I have been looking for all of my giant pore life!  After all I have NEVER put GLUE on my face, that I can recall. Now because I am SUCH awesome and popular person, with a super active social life, I could barely find time to do such a task.  Thank me. Ok in all reality I have a totally free Saturday night and figured I would put glue on my face in between the kids killing each other.  Plus my husband wasn't home to give me weird looks and ask what in the world I was doi

IT WORKS!

Image
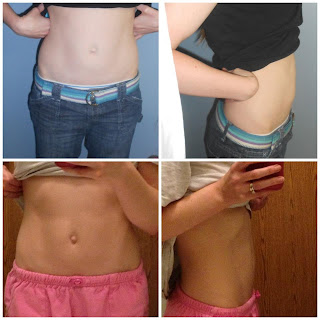
Lately I haven't had time to really craft anything.  School is starting, my Mom moved in with us, my husband has band practice, and I have quite a few doctors appointments to take everyone to.  So...I have decided make a short post to rave about IT WORKS! I know I was a skeptic at first about the whole thing.  I figured the pictures were extremely photo shopped or someone else's body in the after photos. Here are my personal results after doing one wrap.  Yes I know I didn't really 'need' a wrap, but I am amazed with how well it did work!  Oh and NO, I'm not sucking it in.   While I have not done a wrap since this one, I have actively been drinking IT WORKS! Greens.  I LOVE the berry flavored.  Especially added into my morning tea.    I do NOT eat like I should, at all.  I eat a LOT of junk food and drink WAY too much soda.  I have spent years suffering from irregularity and chronic anemia.  The chronic anemia makes me SO tired ALL the time. Yet

Skylanders Chompy Lanterns

Image
WHAT YOU WILL NEED:   -Paper Lantern -Red Felt -White Foam or White Felt -Green Pipe Cleaners -Plastic Eyes -Hot Glue Gun -Scissors 1. Plug in your hot glue gun. 2. Open up your paper lantern, insert the plastic piece that keeps it open.   I bought mine for $1 at the dollar tree, but I believe they are a seasonal item. 2.  Take a piece of red felt and cut out a mouth.  It doesn't have to be perfect.  Hot glue the mouth on to the paper lantern.  Careful not to get burnt.  I did a few times. 3. Take two green pipe cleaners and cut them about 3/4 of the way down.  Use the longer pieces to bend in half, twisting them together. 4. Glue your plastic eyes to one end of the pipe cleaners.  Let cool. 5. Put a dab of hot glue in the center of the lantern above the mouth where you want the eyes to go.  Add the pipe cleaners with the eyes.  Hold in place until set. 6,  Cut out triangle of various sizes using the white foam or felt.  Chompies have

Skylanders Eye Brawl Pinata

Image
  I have one of those kids who always picks a birthday party theme that doesn't have pre-made decor.  Last year is was Ninjago, this year it's Skylanders.  So once again I can't just go out to any party store and pick up little plates and cups stamped with little Skylander faces.  So I am forced to get creative. First up on my ever growing list was a pinata.  After looking through all of my son's Skylanders, I decided Eye Brawl would be the easiest pinata for a beginner to make.  His eye comes off of his body, flies around, and shoots laser beams.  How neat for me because I could just make a could pinata and attach wings!  Bonus that Eye Brawl happens to be in his top Skylanders list. WHAT YOU WILL NEED:   Balloon (I used a punch balloon for a LARGE pinata) Newspaper Flour Water Scisors School Glue Tissue Paper and/or Steamers (White, Black, and Blue) Paper Towel Rolls Wire or Rope Marker Hot Glue Gun Getting Started: Tear up your ne

Tilted Flower Pots.

Image
Tilted Flower Pots My latest project has been an ongoing one.  I have a HUGE vision for the space beside our home that was full of tiger lilies.  Full as in the tiger lilies were over running the space and weeds couldn't even grow (not that I wanted weeds).  With the over abundance of tiger lilies came with a perfect breeding ground for ticks.  Every time we would even walk by the tiger lilies last year to turn on the water house, ended in panic. Hundreds (and that might be understating it) of teeny tiny ticks ran up your arms, legs, anything they could get on. Which later lead me to find a really awesome tip on how to quickly remove those hundreds of fast crawling suckers before they attacked.  Lint Roller.  ANYWAY.  I'm getting side tracked. Early this spring I decided I did NOT want a repeat of last year.  The lilies had to go. So I spent weeks trying to get all of the lilies removed.  Carefully removing all of the worms that had gotten entangled in the roots (

Moldy Bulb Syringe.

Image
  (Photo Circulating the Internet) In High School I babysat twins who often had colds. One day I picked up one of these bulb syringes and black goo poured out all over the little baby's face.  I am so glad I hadn't already stuck it in his nose.  It's a memory that I can still vividly recall, complete with the wave of nausea I felt. I definitely never used that one again, chalking it up to improper cleaning. A few months ago I had seen photos of moldy bulb syringes floating around on Pinterest and Facebook.   I cringed at the thought of someone using the moldy bulb unknowingly on their babies little noses.  I will admit I rolled my eyes a bit and thought, "Well maybe if you cleaned the thing out this wouldn't have happened."   I ALWAYS clean mine out with antibacterial soap, HOT water, and sometimes even alcohol.  Always.  So I NEVER thought in a million years that MY bulb syringe would be nasty and moldy. Today I decided, since my kids nev

I Love YOU because... (craft)

Image
Today in MOPs we made I Love YOU because... frames for our loves :) (Thi s is mine )  WHAT YOU WILL NEED: 1 PICTURE FRAME MARKER S OF YOUR COLOR CHOICES COLORED PAPER OR CAR D STOCK SCISSORS STICKER S OR OTHER EMBELLISHMENTS ( OPTIONAL) DRY ERASE MARKER       We just took a frame from the dollar tree (I chose silver) and took out the card stock border.  Though you could choose to leave it in if you wanted.  Just be prepared to write the Phrase "I love you because..." in the middle of the new colored card stock you are writing on. Cut a new piece of colored card stock or paper of your choice to make it fit in the frame. Then write "I Love You because..." on a new piece of colored card stock.   Make sure you leave enough space so that you can write the rest of the sentence on later. Stick that piece back into the frame, close it up, and turn it over. Now you can decorate the frame with stickers if you want or you can leave it like